In an era where data is the new gold, maintaining a unified customer data system is pivotal for business success. Salesforce, recognized for its robust salesforce data integration and CRM capabilities, has positioned itself as an industry leader, serving over 150,000 salesforce customers around the world. Yet, with growth and expansion, complexities emerge. Organizations branching into new territories or assimilating business partners frequently confront the intricacy of juggling multiple Salesforce instances – or multiple Salesforce “orgs” as they are commonly known. And this is why so many are searching for solutions Salesforce-to-Salesforce (S2S) integrations.
It’s not merely about creating a bridge but orchestrating a seamless integration between different Salesforce instances. With features like published objects related list, external sharing related list, and the flexibility to customize objects and fields, this Salesforce connection strives to eradicate data silos, thereby ensuring smooth data flow.
However, achieving a flawless Salesforce integration is not without its challenges and limitations. From configuring Salesforce settings, managing the connection tab, to prioritizing data privacy under the umbrella of the general data protection regulation, businesses have a lot on their plate.
Enter Syncari, a cutting-edge solution designed to simplify data synchronization across different platforms, including Salesforce. Syncari takes the S2S concept to another level, ensuring that your customer data is not just synchronized, but also clean, reliable, and most importantly, actionable.
Join us as we delve into the nuances of integrating multiple Salesforce instances and how Syncari, as the vanguard of data management, is redefining the rules of Salesforce-to-Salesforce connections.
Understanding Salesforce to Salesforce Connection
What is a Salesforce to Salesforce Connection?
Before we delve further into the intricate world of data management, it’s crucial to understand what Salesforce to Salesforce connection entails. At its core, Salesforce to Salesforce is a feature that allows two Salesforce organizations to share records with each other directly. This means that businesses operating different Salesforce instances can seamlessly connect their data and ensure it remains updated across all platforms in real-time. In essence, Salesforce to Salesforce breaks down the walls between different Salesforce orgs, fostering a more cohesive, collaborative, and data-driven environment.
Manual data sharing with associates becomes tiresome and time-consuming. A solution to this issue is optimizing the data transfer process via Salesforce’s integration product – Salesforce to Salesforce.
Salesforce to Salesforce integration refers to the process of seamlessly connecting two or more Salesforce instances, enabling the exchange of data and information between them. This integration allows organizations to collaborate and share information with their partners, vendors, and customers in real-time, improving overall business operations and increasing productivity.
Managing multiple redundant CRMs can be incredibly complex, time-consuming and costly.
According to a recent survey, companies that implemented this integration saw a 25% increase in their sales productivity and a 30% reduction in their sales cycle time.
One of the key advantages of Salesforce to Salesforce integration is that it enables organizations to seamlessly share data with their partners and customers, allowing for a more streamlined and collaborative approach to business operations.
Moreover, data automation results in significant cost savings, as companies with salesforce integration reported a 35% reduction in operational costs.
[Related: Conga saves $650K in its first year leveraging Syncari to unify 2 Salesforce instances]
However, cobbling multiple CRMs by migrating from or using salesforce to salesforce integrations can be a hassle and may not yield the best results.
By keeping your CRMs in sync and eliminating the need to migrate, Syncari provides unified customer data to democratize and simplify data management while your company scales.
Keep reading this article to learn a bit about Salesforce to Salesforce integration and the various processes that make this integration happen.
Salesforce to Salesforce Integration: Why Is It Important?
The answer is simple—data integrity and accessibility. Salesforce to Salesforce connection brings a wealth of benefits to the table. For one, it eliminates the risk of data silos. Data silos occur when information is held by one department but not accessible by others, thereby reducing the efficiency and effectiveness of business operations. By interconnecting Salesforce instances, businesses can ensure that all necessary data is easily accessible across the board, thereby fostering informed decision-making.
Additionally, a Salesforce to Salesforce connection helps maintain data consistency. Since updates are automatically shared between connected Salesforce instances, there is less risk of data discrepancies or duplications. This results in improved data accuracy, integrity, and reliability—a must in today’s data-driven business landscape.
Salesforce to Salesforce integration is crucial for businesses looking to streamline their operations and improve their overall efficiency. Here are some reasons why:
- Real-time data sharing: Salesforce to Salesforce integration allows for real-time data sharing between two or more Salesforce instances. This means that businesses can collaborate with their partners, vendors, and customers in real-time, resulting in a more streamlined and efficient approach to business operations.
- Improved productivity: By automating various tasks such as lead assignment and follow-up, Salesforce to Salesforce integration can significantly improve productivity.
- Enhanced customer experience: It also allows businesses to better serve their customers by providing them with real-time updates on their orders, service requests, and other interactions. This can lead to higher levels of customer satisfaction and loyalty.
- Cost savings: Implementing Salesforce to Salesforce integration can lead to significant cost savings. According to a recent study, companies that implemented this integration reported a 35% reduction in operational costs.
Salesforce to Salesforce integration is critical for businesses looking to improve their efficiency, productivity, and customer experience while also reducing costs.
By enabling real-time data sharing, automating tasks, and enhancing collaboration, Salesforce to Salesforce integration can help businesses achieve their goals and stay competitive in today’s fast-paced market.
[ Related: Salesforce Shouldn’t Be Your Single Source of Truth – Top Reasons Why ]
There are countless reasons why Salesforce users share records through an S2S integration. Here we have discussed the various effective ways of performing successful Salesforce-to-Salesforce integration.
Method 1: S2S Integration Using Connector
If you wish to switch to the Salesforce UI, you have to configure the standard connector. There are 4 primary areas, which need to be configured and in this section, you will learn about in detail.
1st Part: Switching On the Salesforce to Salesforce Connector
Once you switch to the Salesforce Classic UI [User Interface] and then go to the “Setup” section. In the search area, look for “ Salesforce to Salesforce” and then press on the “Salesforce to Salesforce” settings. When you enable this particular feature, a screen will pop out that carries information of the “Salesforce to Salesforce” setup.
You have to enable it in 1st Org and then repeat the process once more to enable it in the 2nd Org so that you can share data between them.
2nd Part: Make the Salesforce to Salesforce Connection
Once you enable the “Salesforce to Salesforce” feature between 1st Org and 2nd Org, you have to create a connection between them. To begin the process, you first have to make a “Contact Record” and then send an invite to them through a new connection record.
You must use a valid Email address to make a new connection record. Once it’s done, visit the “Connection Tab” and the press on “New Connection”. Make sure to check that you have set up the “New Contact Record” as the contact and set up the relevant Connection Owner from your side.
Click on the “Save” button and then send the invite. Once you get the mail on the other part and then set up the “Connection Record” with the 2nd Org. Well done! You just created a connection between two Orgs.
3rd Part: Publish all the Relevant Fields and Objects
You have to perform this particular step in both 1st Org and 2nd Org. To get started, click on the “New Connection Record”, which you just made and then go to the “Published Object Related” option. Here, you will get the chance to choose the Objects, which you wish to send to the other Org.
You have to sync the “Account Records” between the 1st and 2nd Org. You can do so by checking the account objects located in the next page.
Now, choose the fields that you wish to send between the two Orgs. Under the “Published Objects Related List”, press on the “Edit” option, which is located next to the “Account” option.
Remember, the required fields will get enabled automatically, which you cannot undo. You can add other fields optionally so that it’s published in the other Org. You have to repeat this process in both of the Orgs to enable the 2-way flow of data.
4th Part: Subscribe to the Fields and Objects
In this final part, you just have to subscribe to all the published fields and it needs to be done in both the 1st and 2nd Org. Visit the “Connection Record” for the final time and click on the Unsubscribed/Subscribe, which is found under the “Subscribed Object Related Option”.
Check on the box that you want to subscribe and then click save. Lastly, click on the “Edit” option located next to the Account Row and then check to see all those fields you wish to use are selected.
Method 2: Salesforce to Salesforce Integration with the REST API
Successful integration of Salesforce can also take place with the REST API. The following steps clearly define the entire process:
Step 1: Creating the REST API Endpoints
Before you can connect the Salesforce with REST API, you first have to create the Endpoints with the Apex Class. To begin the process, you need to opt for a programming language of your choice so that it meets all your needs.
After that, you must create an environment and directory structure. Once you’re done, you can test out the endpoint.
Step 2: Making the Connected App
When you’re all done making the Endpoints, you can then create the connected apps with the App Manager. You can find the App Manager, through Quick Find at the Setup Menu and then press on the Create New Connected App.
You can give your API and Connected App a name and then set up a contact email, which is pertinent to your contact information.
After that, you need to check the “Enables OAuthSetting” and then make a callback URL and choose relevant OAuth scopes. You can then leave the settings how it is and click on the “Save” button.
Once you have saved your Connected App, you can copy the Consumer Secret and the Consumer Key as you will need it later on.
Step 3: Configuring the Auth Provider
In this step, you have to make another Auth Provider from a different org. You can start by pressing on the “New Auth Provider” option and then choose “Salesforce” as the provider. Under the Auth Provider Edit box, you will find the following fields, which you have to fill:
- The Provider’s Type [Salesforce]
- The Name of the Auth Provider [Provide a name]
- The URL Suffix [Use one according to your choice]
- Consumer Key [Provide your consumer key]
- Authorize Endpoint URL [Salesforce will set it up automatically, you don’t need to provide]
- Total Endpoint URL [Salesforce will set it up, leave the area blank]
Once you’re done with everything, you can click on the Save option to save all your settings. Now, you will get a new Callback URL, which you will find generated at the bottom section of the Salesforce Configuration Page.
You have to copy this new Callback URL and use it to update the Callback value for your Connected App.
Step 4: Make the Named Credentials
In this final step, you have to make a Named Credential as it will enable the org to connect with the Connected App without much issues. To do so, you first have to look for the Named Credential option on Quick Find and then click on the “New” option. After that, you have to fill out the following values:
- Provide the Named Credential with a Name and Label
- Set up an URL based on your Salesforce org
- Provide an identity type [It should a named principal]
- Provide an authentication protocol [It should be OAuth 2.0]
- Set up an authentication provider [Provide an authentication provider you made]
- Provide the “Scope”
- Allow the Merge Field in the HTTP header
- Keep all the things just how it is and save it.
Managing Salesforce to Salesforce Connection
Limitations of a Native S2S Integration
Before plunging deeper into the benefits of Syncari, it’s essential to understand the inherent challenges posed by a native Salesforce to Salesforce (S2S) connection:
Syncing with Other Systems
A native S2S connection can often struggle when it comes to integrating Salesforce data with other systems. This lack of seamless integration can lead to fragmented data models, making it challenging to achieve a unified view of customer data.
Deduplication and Merge Flows
With multiple Salesforce orgs and other connected systems in the mix, the risk of data duplication is high. Running deduplication and merge flows across both Salesforce instances, let alone other systems, can be intricate and time-consuming. In contrast, Syncari offers a bonus here – it efficiently handles these tasks across all connected platforms.
Downtime Sync Issues
If one or both Salesforce instances face downtime, the native S2S connection can lead to significant sync problems. This can disrupt the sales data, marketing data, and other business processes dependent on real-time data flow. There’s also the potential for loss of key metrics during these downtimes, negatively impacting strategic decision-making.
The Syncari Alternative
Syncari not only addresses these inherent S2S problems but also amplifies the benefits of Salesforce integration. Whether you’re managing records private or public, transferring data between two Salesforce orgs, or ensuring compliance with the general data protection regulation, Syncari provides a robust platform that outshines the native S2S feature.
When you consider the challenges in managing connections tab, publishing objects, configuring Salesforce settings, and maintaining data sharing permissions, the advantages of Syncari become even more evident.
While Salesforce Connect and other Salesforce services provide tools for salesforce data integration, Syncari elevates the entire process, ensuring that integrating Salesforce is not just about connecting two systems but truly optimizing data consolidation, sharing, and business growth.
Tips to Manage S2S Connections
Successfully setting up a Salesforce to Salesforce (S2S) connection is only half the battle won. The real challenge lies in effectively managing this connection to ensure seamless data flow and maintain data integrity. Here are some tips to help you effectively manage your S2S connections:
Continual Monitoring
Regularly monitor your S2S connections to detect any discrepancies or issues early. This could include checking for data mismatches or ensuring data sync is happening as planned.
Maintain Data Privacy and Security
Always keep data privacy and security at the forefront. Be selective about the data you share and ensure it complies with all relevant privacy laws and regulations.
Periodic Data Cleaning
Implement regular data cleaning routines to keep your data accurate and up-to-date. This could include removing duplicates, fixing errors, and updating outdated information.
Streamline Access Control
Control who has access to shared data. Implement appropriate access controls to ensure that only authorized personnel can view and edit shared data.
Despite your best efforts, problems may arise if S2S connections are mismanaged. These could range from data inconsistencies due to unaddressed errors or duplicates, breaches in data security, and even legal repercussions if data privacy regulations are not adhered to. Not to mention, mismanagement can also lead to inefficient business operations and misguided decision-making.
Here again, Syncari proves to be an invaluable ally. Syncari can help manage these connections by providing real-time visibility into your data, allowing you to detect and address issues promptly. Its automated data cleaning capabilities ensure that your data is always reliable, while its robust security features maintain the highest level of data privacy and protection.
Syncari also allows for the implementation of data policies, ensuring that all data complies with your business rules and regulations. And with its unified data management solution, you can manage your data across various platforms in a centralized location, further simplifying the management process.
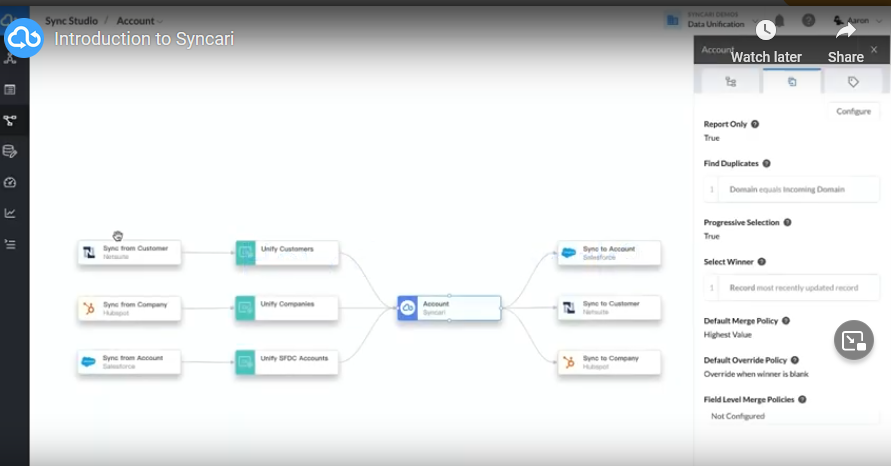
Method 3: Salesforce To Salesforce Integration using Syncari (No Code Sync & Automation Tool)
Successful integration is possible with the methods mentioned above. However, you can also do it easily with Syncari, a no-code integration tool. Syncari will help you create the Salesforce to Salesforce connection, as well as help you synchronize and back up your Salesforce data.
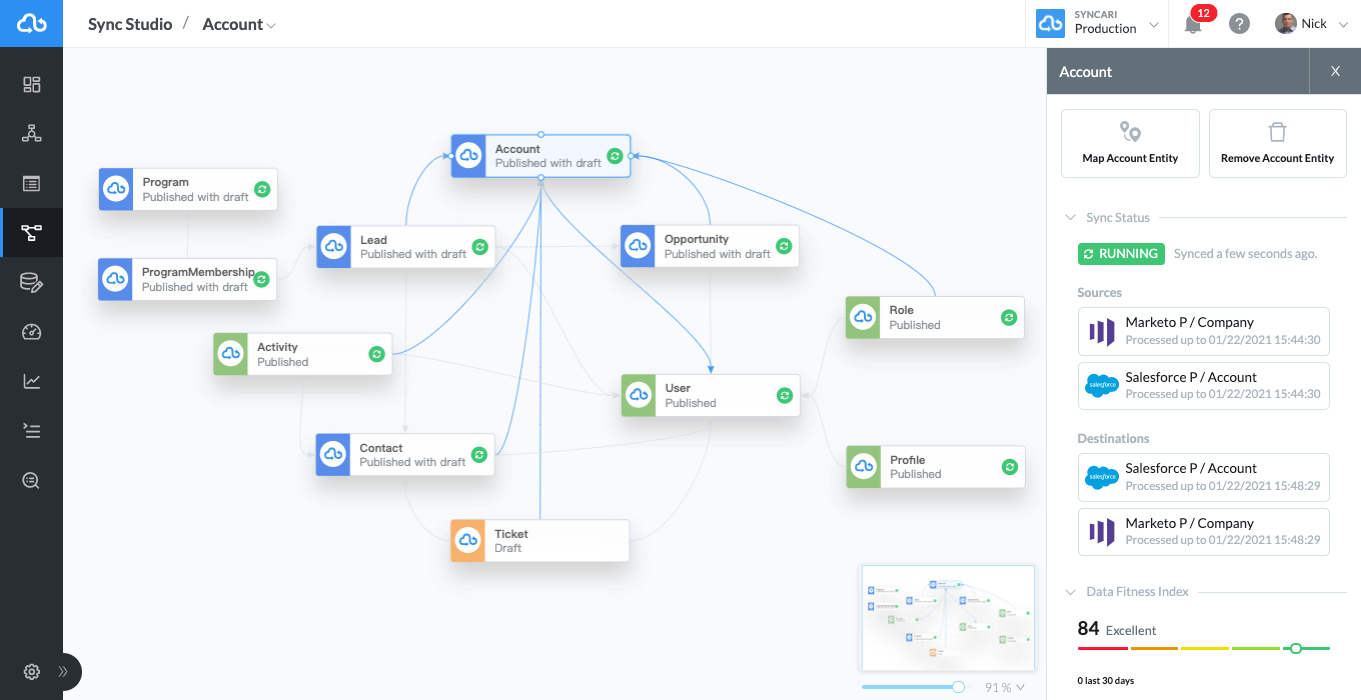
Understanding the Salesforce Data Model
Sync Studio helps in routing objects from Salesforce to Syncari entities. From getting periodic data updates to getting them in real-time, enriched, and cleansed, Syncari will make it happen. You can synchronize the following objects through the Salesforce Synapse:
- Contact
- Campaign
- Custom
- Opportunity
- Lead
- User
- Account
Once you are through with these entities, it’s time to rely on Syncari to make the Salesforce-to-Salesforce integration happen. Here’s how!
Step 1: Data Cleansing and Normalizing
If there are data fields involved in the deduplication logic, then the data needs to be cleaned. Before domain extraction, the website data and emails should be cleaned, to prevent domain extraction from a wrong email.
Step 2: Identification Of Duplicate Records
With Syncari, you can create rules to identify duplicates easily in your CRM. The primary data field that helps in duplicate identification is the email address. Website domains, company name, and phone numbers are some of the additional fields in this regard.
With Syncari as your data automation platform, you can identify the deduplication issues, and distribute clean data across systems.
Step 3: Create Deduplication Rules and Logic
After the duplicate records get identified in the database, you will have to find out the winning as well as surviving records. Creating the logic and deduplication logic is important in this part. Syncari will run continuous tests and also create multiple iterations until the results match with the deduplication logic you created.
Step 4: Run Tests and Iterations
Under this step, your deduplication logic tries to capture almost 100% duplicates. It is right here that Syncari performs multiple iterations to make sure that duplication is captured and all gaps are closed. With its unified system, it can easily source data from multiple sources easily and swiftly.
Syncari is one such no-code tool that ensures smooth identification of deduplication processes and matches them with your logic for quick resolution. Since it integrates with Salesforce without much hassles, deduping becomes easy.
Case Study: Successful Salesforce to Salesforce Connection with Syncari – Conga
Real-life use cases offer valuable insights into a solution’s capabilities and the transformative power it can bring to a business. Let’s take a closer look at Conga, a leader in digital document transformation, which successfully harnessed the capabilities of Syncari for their Salesforce to Salesforce (S2S) connections.
In May 2020, Conga and Apttus, a leading quote-to-cash solution provider, merged to create a holistic digital transformation solution for commercial operations. However, this merger came with a set of challenges. The primary task was to unify siloed data, processes, and technology from both entities within 12 months. With disparate technology stacks, disjointed data, and leads getting dropped while transitioning from the marketing stack to the CRM, the challenge was indeed daunting.
But with Syncari, Conga’s operations team found a solution. Syncari, a no-code platform, was quickly implemented without straining time-constrained IT resources. The result? A whopping 4x faster first response time, elimination of over 50 custom integrations, and projected Year 1 cost savings of $625k.
Conga employed Syncari to unify, clean, and manage cross-system data, centralize multi-vendor enrichment, and append missing lead activity data to opportunity records. The platform also helped automate interconnected workflows and reporting, routing leads to the appropriate rep, and distributing trusted cross-functional data and insights. The ease-of-use, completeness, and extremely fast ROI from Syncari proved to be game-changers.
As a next step, Conga plans to unify more of their tech stack, merge redundant CRMs, and enforce data consistency with Syncari. This case study clearly illustrates how Syncari can streamline S2S connections, overcome data integration challenges, and deliver tangible business results. By simplifying data management, Syncari empowers businesses to focus on what matters most – growth and transformation.
[WATCH: Coffee With Customers: Data Unification with Conga’s Scott Merselis ]
What’s the Next Step?
When it comes to taking the “next step”, you can unify your enterprise tech stack with Syncari and also get to implement the viscosity of the data. It will also allow to coalesce repetitive contacts, accounts and CRMs while preserving the data probity.
Since data is at the heart of every organization, especially the ones that operate on customer-centric approaches and models, Syncari would be the most awaited solution for them.
If you wish to achieve successful data automation and sharing across departments, Syncari is what you need.
The Role of Syncari in Salesforce to Salesforce Connection
For many organizations, the Salesforce to Salesforce (S2S) connection represents a significant step toward a seamless data integration environment. Syncari plays a pivotal role in simplifying this process, providing powerful features that support effective data integration and synchronization.
One of Syncari’s standout features is its no-code interface. This allows non-technical users to manage data and build workflows easily, thereby democratizing data management. Syncari’s unified data management solution ensures that data is consistent and reliable across all platforms, eliminating data silos and discrepancies.
Moreover, Syncari offers advanced automation capabilities, which streamline data management processes, saving businesses time and resources. It also ensures high-level data privacy and protection, enabling businesses to share data securely.
Using Syncari for Salesforce integration has numerous benefits. Not only does it simplify the S2S setup and management process, but it also allows for data synchronization beyond Salesforce, creating a truly unified data ecosystem. The ability to integrate data from various platforms gives businesses the flexibility to have any component at the center of their data universe, not just Salesforce.
But perhaps the most powerful testament to Syncari’s capabilities are the endorsements from its users. Scott Merselis, Sr Operations Manager, praises Syncari’s impact, stating, “Syncari is helping us simplify and democratize data management as we scale. It allows my team to automate workflows and build new processes at the pace we require and puts us back in control of our operations roadmap.”
Similarly, Chris Thompson, Head of Marketing Operations, values the flexibility that Syncari brings, saying, “Syncari has given us the option to not have Salesforce as the center of our data universe. Now, any component can be at the center. And to me, that alone is worth its weight in gold.”
Clearly, Syncari offers the tools and capabilities businesses need to make the most of their S2S connections, demonstrating its role as a vital ally in the journey towards efficient data management.
Conclusion
Salesforce to Salesforce (S2S) connections have undeniably become a significant facet of effective data management for businesses. These connections allow businesses to seamlessly share and sync data between different Salesforce orgs, unlocking new levels of efficiency, collaboration, and data-driven decision-making.
However, managing these connections and ensuring data integrity across various platforms can be complex and challenging. That’s where Syncari steps in. As we’ve discussed, Syncari’s unified data management solution simplifies the S2S setup and management process and allows for data synchronization beyond Salesforce. Its no-code interface, advanced automation capabilities, and commitment to data privacy and protection make it a powerful ally for any business looking to enhance its data integration capabilities.
Real-life use cases, like that of Conga, and the glowing testimonials from users, further reinforce the transformative impact that Syncari can have on a business’s data management practices. So, if you’re looking to simplify your data integration processes, increase operational efficiency, and drive more value from your data, Syncari could be the solution you’re looking for.
Interested in learning more about how Syncari can revolutionize your data management practices? Visit our website to get more information or better yet, start a free trial today. Empower your business with Syncari and harness the full potential of your data.
Why Syncari is the Best Alternative for Unified CRM Sync
Syncari has become the go-to scalable solution for businesses that want to eliminate the need to migrate from one Salesforce instance to another.
Syncari – being the only system to come with patented stateful multi-directional sync – helps companies to get rid of points-to-points integration and offers a unified and simplified approach to CRM syncing or data integration.
With Syncari, you can not only sync two or three Salesforce instances, but multiple other systems as well, creating unified customer datasets with a massive reduction in time and cost.
This unified CRM syncing approach assists organizations in generating data without relying on any Salesforce instance or dealing with Salesforce to Salesforce integration every time you need to sync CRM data.
But how can Syncari unify cross-system or Salesforce to Salesforce data? Let’s find out.
Syncari’s stateful multi-directional sync capabilities enable any enterprise to unify and handle cross-system data in the following ways:
- It streamlines and unifies multi-vendor (Salesforce) enrichment to enhance data segmentation, data quality and targeting across various Salesforce instances in real time.
- To address and fill any gaps in the comprehensive-funnel reporting, Syncari adds data on missing lead activities to the opportunity records.
- Comprehensive data reports from Syncari can be used in Power BI and other tools like Snowflake to distribute and share reliable cross-functional insights and data.
Salesforce To Salesforce Integration Via Syncari, a Powerful Data Automation Tool
When implementing Salesforce to Salesforce integrations, you have a variety of alternatives at your disposal, with both Salesforce internal tools and third-party integration software products. The majority of the time, using a third-party data connection platform like Syncari is easier and less expensive than integrating Salesforce manually.
This tool gives you more control over your Salesforce connection, whether you want to combine data from one provider or your entire company. Syncari provides two significant benefits over other ETL solutions if your company has to do Salesforce to Salesforce integrations:
- Complete Automation: Syncari gives you the ability to entirely automate Salesforce administration as well as control data warehouses, available APIs, databases, and file storage.
- No-Coding: With Syncari, you won’t have to write a single code. Without coding, it lets you bring customer data within the plater and later send it back to Salesforce. Thanks to the software’s transformation layer, any organization can now easily collect, clean, edit, and modify the data as per their requirement so that it fits their ETL procedures.
Conclusion
No matter the reason, if your company wants to connect Salesforce you must do a few things. Firstly, assess why it is essential for your company and then choose one of the above methods to share the data and keep records.
You may benefit from numerous more features like data replication, data backup, and integration with other third-party data providers if you pick the Syncari Data Integration tool to connect your Salesforce orgs together.
Use Syncari for your Salesforce to Salesforce integration and keep things simple and hassle-free.
Begin exploring the world of Syncari Data Integration.